I then read a document saying that the MoT test rules were going to get more strict on aftermarket HID, and with the MoT test imminent I decided to swap to LED lights. (Mainly because they swap out for halogens a lot more easily)
I did a tiny amount of research online and bought some of these based on an online recommendation of another (US Amazon only) lamp with the same LED.
https://www.amazon.co.uk/gp/product/B078YRBNM2/
Somewhat later I read this rather informative blog post with actual measurements and tests
https://www.autobulbsdirect.
Had I read that first I probably wouldn't have bought the ones I bought.
Anyway, fitting them was pretty easy, once I had removed the HID bulbs and their ballasts. (Which was less easy, I had fitted them rather "elaborately" all those years ago.)
With the new bulbs in place there was a slight problem:
As can be seen, the fan/heatsink pokes rather a long way out of the back of the dipped beams (though not out of the main beams to any great extent).
The solution was simple, and for pretty much the first time my 3D printer was set to work making actual working parts (It has made quite a few foundry patterns).
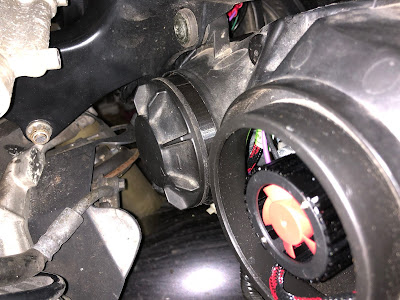
This is what the part looks like, it is a copy of the bayonet of the original rear cover, mated to a copy of the socket of the headlamp unit.
It looks reasonably tidy in-situ.
The main beam units originally have a rubber cover with a hole in it for the lamp connector (I have no idea why they fitted a neat cover to the dips and an old-fashioned thing to the mains.
I need to mention here that a side-effect of the funny rubber cover is that the main bulbs need a plug-on adaptor that pokes through the rubber. The spring clip for the bulbs won't work without this, or some other spacer. I used some that I machined from Delrin for the HID elements. It might be possible to cut-down the original spacers but making something is probably better, and it could be done with a hacksaw and drill if some plastic rod of the right diameter was located.
I had some spare dip-beam back covers as a side-effect of a high-side at Cadwell Park and made some adaptors to allow those to mount to the main beam housings.
The place where the rubber cover mounted is tapered, so I modelled a matching taper on the new part. It just pushes on and sticks like a Morose Tapir Morse Taper. I might add glue later.
Unfortunately because the bayonet latches of the covers won't fit through the rim on the housing these adaptors end up a bit long.
I hope that I will eventually get used to the aesthetics. If not I might have to try something else. I could just glue the cap into the adaptor and rely entirely on the taper, that would shorten the assembly significantly.
At least there is plenty of space for air circulation.
I did end up removing one fin from the dip beam cover. The bottom yoke _just_ touched it at full lock, and I know how much the MoT man hates that sort of thing. The main beam covers are a long way below the bars at full lock and are no problem at all.


This comment has been removed by a blog administrator.
ReplyDelete